You are now ready to start making the girl's body.
For
this
step, you will need a needle and sewing
thread
which matches the color of the overskirt.
• Measure down from the top of the skirt and make
small marks for where the waist and neck will be
positioned. Measure down 3/4" for the neck, and
1 1/4" for the waist. Make sure that you mark all
around
the skirt, starting and ending in the front.
• Flatten the skirt so that the glued seam is in the
back, and the folded hems are facing down. Using
a pair of scissors, cut down exactly to the waist
marks
on either side of the skirt. This opening will
create the space where the arms will be inserted.
• With a needle and thread, sew along the waist
marks, starting and
ending in the back. Using a
common running stitch, make the spacing of the
stitches fairly wide at about 1/4" apart. This step
makes it much easier to pull in the waist so that
the skirt will have pretty and even gathers.
• Gather in the waist by pulling on the thread while
pushing the crepe paper in to create
even pleats.
When the waist is pulled in to about 1/2" across,
loop one
end of the thread around the body twice,
then pull tight and make a knot at the back.
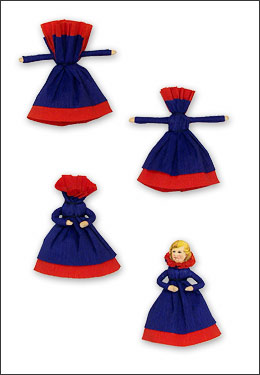
• Set in the arms by pulling open the section of the
skirt that is now the "bodice," and add a bit of glue
about 3/8" up from the waist. Lay the arm piece on
the glue, positioning the arms so that the seam of
the sleeve is face down. The arms should extend
out from either side of the waist by about 1 3/16".
• Gather in the extra crepe paper above the arms,
making sure not to overlap the crepe paper folds
too much. Using the neck marks as a guide (about
3/4" down from the top), loop the sewing thread
around the gathered crepe paper twice and pull it
in tight. Knot the thread in the back. The figure will
look nicer if the neck is tied smaller than the waist.
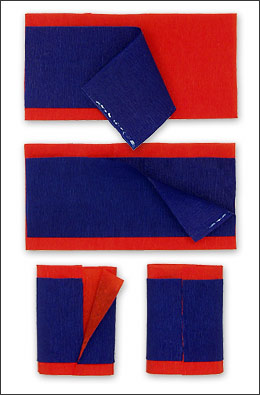
• Bend the arms into the desired position.
• Fluff open the collar by pulling the crepe paper
ends open, almost like the petals of a flower. At
this time you may cut down the collar to the final
width you would like for your finished figure.
• Glue in the scrap head, making sure that the face
is tucked well down into the collar. If too much of
the neck shows, the girl will look a bit like a giraffe!
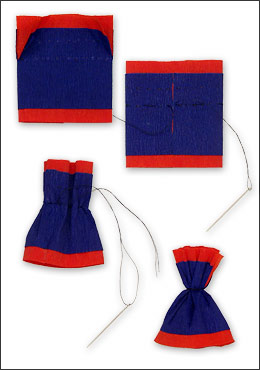
Only two pieces of crepe paper will be necessary
to create the entire girl figure of a skirt and bodice:
the smaller overskirt and the larger underskirt.
• Fold the crepe paper overskirt and underskirt in
half. Please note that when you fold the two skirt
pieces that they should be folded against the grain
so that the creped grain will run vertically on each
skirt . This is an important step so that the skirt will
make straight pleats when it is pulled into gathers.
• Lay out the pieces so that both folded edges are
face down. The folded edges make neat hems at
the bottom of the skirt, and the open edges at the
top will be fluffed out to create the frilly collar.
• Position the overskirt on top of the underskirt so
that about 3/8" of the underskirt shows from both
the top and bottom. Lightly glue down the overskirt
on top of the underskirt, running a thin line of glue
about 2" up from the fold on the underside edges
of the left and right sides. Don't glue down the top
as
this will make it easier to fluff open the collar.
• Lift down the top, open flap of the overskirt and
glue both end sides about 2" up from the fold.
• Roll the skirt into a circle and insert one end so it
tucks "inside" the other end. Push it in about 1/4";
glue edges of the two ends together. This creates
a neat, straight seam at the back of the skirt.